Hexo魔改教程1
魔改前必看(最好认真看完🥗)
- 魔改前,先
准备好Butterfly的仓库备份
,以免出现语法等一系列报错之后查看源代码进行回滚(重中之重) - Hexo小白谨慎魔改,在此之前,请通过
网上学习js、pug、css、styl等语言再进行魔改
,以免报错后甩锅 - 本教程提到的需要的插件都为开源免费,如果插件从开源变成了闭源或者收费,请
告知作者删除关于闭源或者收费的插件教程
- 本教程插件来源于网上,轮子都是大佬造好的,再加上我自己的图片替换和稍加改造,具体以大佬的教程为主,本处仅做一个总结,
如有侵权请联系删除
。 - 本帖涉及魔改源码的内容,会使用diff代码块标识,复制时请不要忘记删除前面的
+、-
符号。 - 鉴于每个人的根目录名称都不一样,本帖博客根目录一律以
[BlogRoot]
指代。 - 因为
.pug
和.styl
以及.yml
等对缩进要求较为严格,请尽量不要使用记事本等无法提供语法高亮的文本编辑器进行修改
。 - 本帖基于Butterfly主题进行魔改方案编写,因此请读者
优先掌握Butterfly主题官方文档的内容后再来进行魔改
。 - 魔改会过程常常引入自定义的css与js文件,请自行上网查找如何在Butterfly引入css和js(太懒了不想自己写)
violet留言板(店长)
查看教程
在[Blogroot]运行命令安装插件npm install hexo-butterfly-envelope --save
在站点配置文件_config.yml
或主题配置文件_config.butterfly.yml
添加以下配置项# envelope_comment
# see https://akilar.top/posts/e2d3c450/
envelope_comment:
enable: true #控制开关
custom_pic:
cover: https://npm.elemecdn.com/hexo-butterfly-envelope/lib/violet.jpg #信笺头部图片
line: https://npm.elemecdn.com/hexo-butterfly-envelope/lib/line.png #信笺底部图片
beforeimg: https://npm.elemecdn.com/hexo-butterfly-envelope/lib/before.png # 信封前半部分
afterimg: https://npm.elemecdn.com/hexo-butterfly-envelope/lib/after.png # 信封后半部分
message: #信笺正文,多行文本,写法如下
- 有什么想问的?
- 有什么想说的?
- 有什么想吐槽的?
- 哪怕是有什么想吃的,都可以告诉我哦~
bottom: 自动书记人偶竭诚为您服务! #仅支持单行文本
height: #1050px,信封划出的高度
path: #【可选】comments 的路径名称。默认为 comments,生成的页面为 comments/index.html
front_matter: #【可选】comments页面的 front_matter 配置
title: 留言板
comments: true
文章置顶滚动栏(店长)
查看教程
安装插件,在博客根目录[Blogroot]
下打开终端,运行以下指令:npm install hexo-butterfly-swiper --save
在站点配置文件_config.yml
或者主题配置文件_config.butterfly.yml
中添加# hexo-butterfly-swiper
# see https://akilar.top/posts/8e1264d1/
swiper:
enable: true # 开关
priority: 5 #过滤器优先权
enable_page: all # 应用页面
timemode: date #date/updated
layout: # 挂载容器类型
type: id
name: recent-posts
index: 0
default_descr: 再怎么看我也不知道怎么描述它的啦!
swiper_css: https://npm.elemecdn.com/hexo-butterfly-swiper/lib/swiper.min.css #swiper css依赖
swiper_js: https://npm.elemecdn.com/hexo-butterfly-swiper/lib/swiper.min.js #swiper js依赖
custom_css: https://npm.elemecdn.com/hexo-butterfly-swiper/lib/swiperstyle.css # 适配主题样式补丁
custom_js: https://npm.elemecdn.com/hexo-butterfly-swiper/lib/swiper_init.js # swiper初始化方法
要用的时候,在文章的front_matter中添加swiper_index配置项即可。---
title: 文章标题
date: 创建日期
updated: 更新日期
cover: 文章封面
description: 文章描述
swiper_index: 1 #置顶轮播图顺序,非负整数,数字越大越靠前
---
自定义字体(自家用)
查看教程
声明:非商免字体未经授权仅限个人使用,不得用于商业用途!
这里以方正FW筑紫A圆D为例,这款字体无论是美观性,还是协调性都是很好的,很适合用来做网站全局字体
下载字体
在custom.css里添加代码(没有可自行于[Blogroot]\source\
创建css文件夹,再创建custom.css)
说明:custom.css记得引入inject,具体上网查找,这里不多提及
@font-face {
/* 为载入的字体取名字(随意) */
font-family: 'FZFW ZhuZi A YuanS D';
/* 字体文件地址(相对或者绝对路径都可以) */
src: url(/font/FZFWZhuZiAYuanJWD.woff2);
/* 定义加粗样式(加粗多少) */
font-weight: normal;
/* 定义字体样式(斜体/非斜体) */
font-style: normal;
/* 定义显示样式 */
font-display: block;
}
在_config.butterfly.yml
里添加如下代码(如已添加可自行修改)
font:
global-font-size: 16px
code-font-size: 16px
font-family: FZFW ZhuZi A YuanS D, FZFW ZhuZi A YuansS D, "FZFW ZhuZi A YuanS D", "FZFW ZhuZi A YuanS D", Lato, Roboto, "FZFW ZhuZi A YuanS D", "FZFW ZhuZi A YuanS D", "FZFW ZhuZi A YuanS D", sans-serif
code-font-family: consolas, Menlo, "consolas", "FZFW ZhuZi A YuanS D", "FZFW ZhuZi A YuansS D", sans-serif
黑夜霓虹灯2.0(纯CSS实现)(Fomalhaut)
查看教程
这个就是在博客主页标题加上霓虹灯
在自定义的custom.css中添加如下代码,实现的原理就是关键帧线性插值,然后一直循环,这里默认是左上角标题、中间标题和副标题,还有文章页头的标题和信息有循环霓虹灯,菜单的文字实现起来要改一下源码,个人觉得没必要了,这样就够了,多了反而花里胡哨:/* 日间模式不生效 */
[data-theme="light"] #site-name,
[data-theme="light"] #site-title,
[data-theme="light"] #site-subtitle,
[data-theme="light"] #post-info {
animation: none;
}
/* 夜间模式生效 */
[data-theme="dark"] #site-name,
[data-theme="dark"] #site-title {
animation: light_15px 10s linear infinite;
}
[data-theme="dark"] #site-subtitle {
animation: light_10px 10s linear infinite;
}
[data-theme="dark"] #post-info {
animation: light_5px 10s linear infinite;
}
/* 关键帧描述 */
@keyframes light_15px {
0% {
text-shadow: #5636ed 0 0 15px;
}
12.5% {
text-shadow: #11ee5e 0 0 15px;
}
25% {
text-shadow: #f14747 0 0 15px;
}
37.5% {
text-shadow: #f1a247 0 0 15px;
}
50% {
text-shadow: #f1ee47 0 0 15px;
}
50% {
text-shadow: #b347f1 0 0 15px;
}
62.5% {
text-shadow: #002afa 0 0 15px;
}
75% {
text-shadow: #ed709b 0 0 15px;
}
87.5% {
text-shadow: #39c5bb 0 0 15px;
}
100% {
text-shadow: #5636ed 0 0 15px;
}
}
@keyframes light_10px {
0% {
text-shadow: #5636ed 0 0 10px;
}
12.5% {
text-shadow: #11ee5e 0 0 10px;
}
25% {
text-shadow: #f14747 0 0 10px;
}
37.5% {
text-shadow: #f1a247 0 0 10px;
}
50% {
text-shadow: #f1ee47 0 0 10px;
}
50% {
text-shadow: #b347f1 0 0 10px;
}
62.5% {
text-shadow: #002afa 0 0 10px;
}
75% {
text-shadow: #ed709b 0 0 10px;
}
87.5% {
text-shadow: #39c5bb 0 0 10px;
}
100% {
text-shadow: #5636ed 0 0 10px;
}
}
@keyframes light_5px {
0% {
text-shadow: #5636ed 0 0 5px;
}
12.5% {
text-shadow: #11ee5e 0 0 5px;
}
25% {
text-shadow: #f14747 0 0 5px;
}
37.5% {
text-shadow: #f1a247 0 0 15px;
}
50% {
text-shadow: #f1ee47 0 0 5px;
}
50% {
text-shadow: #b347f1 0 0 5px;
}
62.5% {
text-shadow: #002afa 0 0 5px;
}
75% {
text-shadow: #ed709b 0 0 5px;
}
87.5% {
text-shadow: #39c5bb 0 0 5px;
}
100% {
text-shadow: #5636ed 0 0 5px;
}
}
听话的鼠标(Fomalhaut)(不如叫点点鼠标)
查看教程
新建文件[BlogRoot]\source\js\cursor.js
,在里面写上如下代码:var CURSOR;
Math.lerp = (a, b, n) => (1 - n) * a + n * b;
const getStyle = (el, attr) => {
try {
return window.getComputedStyle
? window.getComputedStyle(el)[attr]
: el.currentStyle[attr];
} catch (e) {}
return "";
};
class Cursor {
constructor() {
this.pos = {curr: null, prev: null};
this.pt = [];
this.create();
this.init();
this.render();
}
move(left, top) {
this.cursor.style["left"] = `${left}px`;
this.cursor.style["top"] = `${top}px`;
}
create() {
if (!this.cursor) {
this.cursor = document.createElement("div");
this.cursor.id = "cursor";
this.cursor.classList.add("hidden");
document.body.append(this.cursor);
}
var el = document.getElementsByTagName('*');
for (let i = 0; i < el.length; i++)
if (getStyle(el[i], "cursor") == "pointer")
this.pt.push(el[i].outerHTML);
document.body.appendChild((this.scr = document.createElement("style")));
// 这里改变鼠标指针的颜色 由svg生成
this.scr.innerHTML = `* {cursor: url("data:image/svg+xml,<svg xmlns='http://www.w3.org/2000/svg' viewBox='0 0 8 8' width='8px' height='8px'><circle cx='4' cy='4' r='4' opacity='.5'/></svg>") 4 4, auto}`;
}
refresh() {
this.scr.remove();
this.cursor.classList.remove("hover");
this.cursor.classList.remove("active");
this.pos = {curr: null, prev: null};
this.pt = [];
this.create();
this.init();
this.render();
}
init() {
document.onmouseover = e => this.pt.includes(e.target.outerHTML) && this.cursor.classList.add("hover");
document.onmouseout = e => this.pt.includes(e.target.outerHTML) && this.cursor.classList.remove("hover");
document.onmousemove = e => {(this.pos.curr == null) && this.move(e.clientX - 8, e.clientY - 8); this.pos.curr = {x: e.clientX - 8, y: e.clientY - 8}; this.cursor.classList.remove("hidden");};
document.onmouseenter = e => this.cursor.classList.remove("hidden");
document.onmouseleave = e => this.cursor.classList.add("hidden");
document.onmousedown = e => this.cursor.classList.add("active");
document.onmouseup = e => this.cursor.classList.remove("active");
}
render() {
if (this.pos.prev) {
this.pos.prev.x = Math.lerp(this.pos.prev.x, this.pos.curr.x, 0.15);
this.pos.prev.y = Math.lerp(this.pos.prev.y, this.pos.curr.y, 0.15);
this.move(this.pos.prev.x, this.pos.prev.y);
} else {
this.pos.prev = this.pos.curr;
}
requestAnimationFrame(() => this.render());
}
}
(() => {
CURSOR = new Cursor();
// 需要重新获取列表时,使用 CURSOR.refresh()
})();
在[BlogRoot]\source\css\custom.css
添加如下代码:/* 鼠标样式 */
#cursor {
position: fixed;
width: 16px;
height: 16px;
/* 这里改变跟随的底色 */
background: var(--theme-color);
border-radius: 8px;
opacity: 0.25;
z-index: 10086;
pointer-events: none;
transition: 0.2s ease-in-out;
transition-property: background, opacity, transform;
}
#cursor.hidden {
opacity: 0;
}
#cursor.hover {
opacity: 0.1;
transform: scale(2.5);
-webkit-transform: scale(2.5);
-moz-transform: scale(2.5);
-ms-transform: scale(2.5);
-o-transform: scale(2.5);
}
#cursor.active {
opacity: 0.5;
transform: scale(0.5);
-webkit-transform: scale(0.5);
-moz-transform: scale(0.5);
-ms-transform: scale(0.5);
-o-transform: scale(0.5);
}
引入iconfont自定义图标(店长)
查看教程
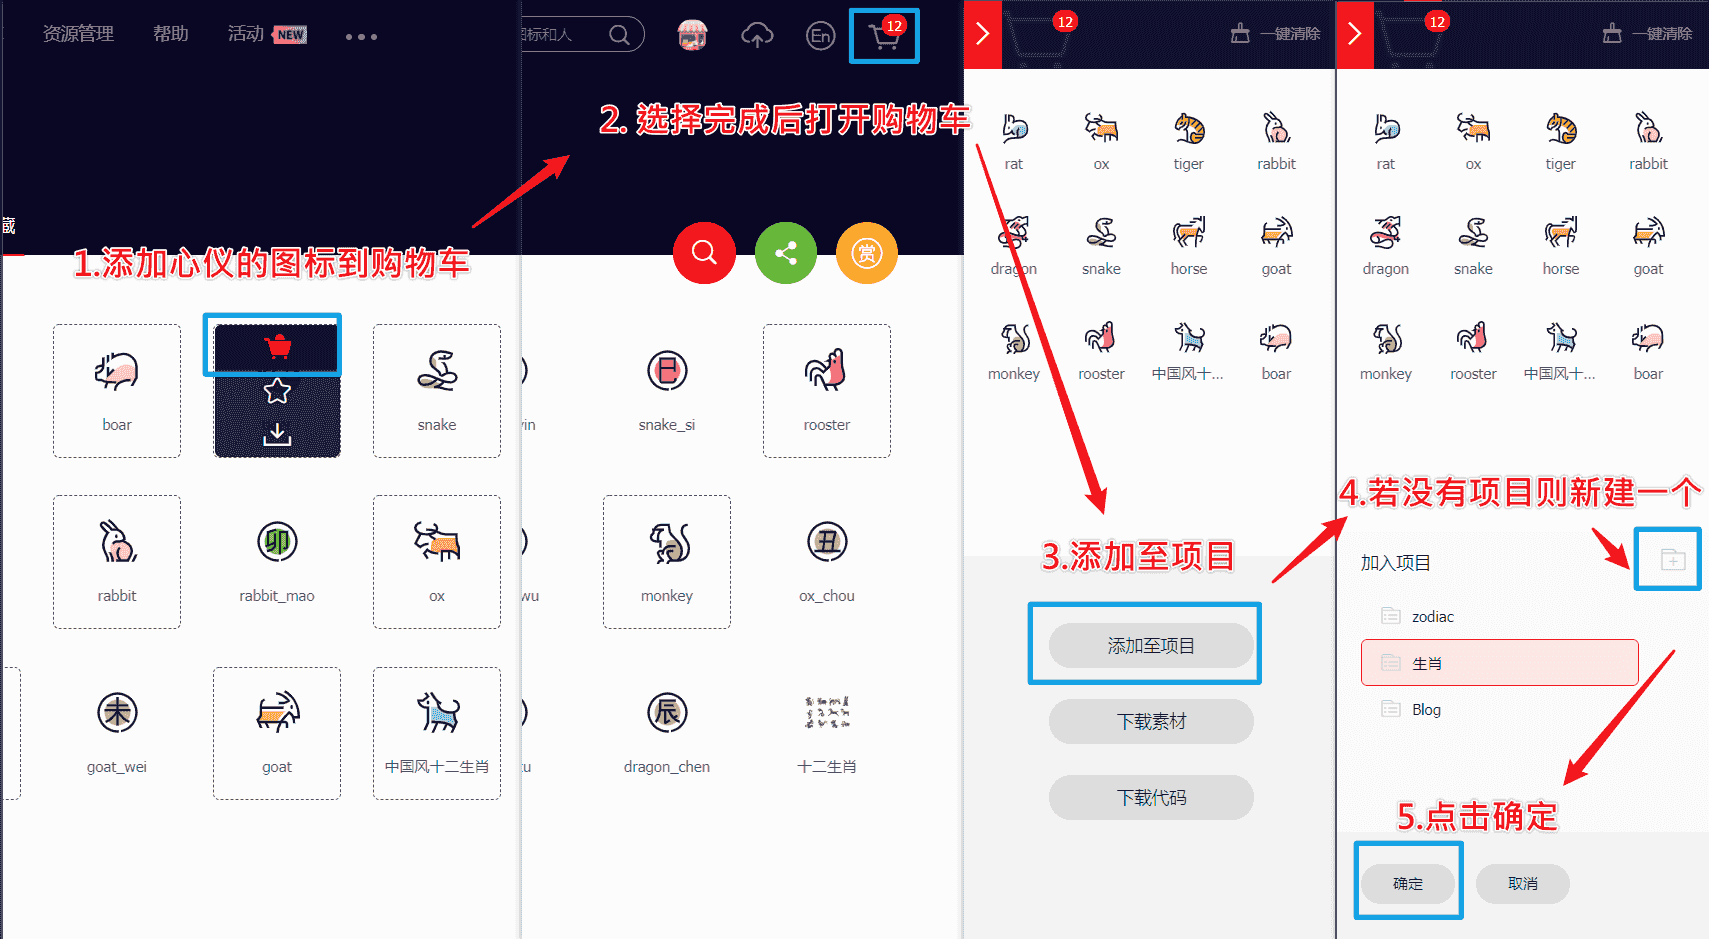
注册准备
- 访问阿里巴巴矢量图标库,注册登录。(要手机号)
- 搜索自己心仪的图标,然后选择添加入库,加到购物车。
- 选择完毕后点击右上角的购物车图标,打开侧栏,选择添加到项目,如果没有项目就新建一个。
引入使用
- 可以通过上方顶栏菜单->资源管理->我的项目,找到之前添加的图标项目。(现在的iconfont可以在图标库的项目设置里直接打开彩色设置,然后采用fontclass的引用方式即可使用多彩图标。但是单一项目彩色图标上限是40个图标,酌情采用。)
点击生成代码就可以创建Font class
和Symbol
文件,首先在custom.css
中引入Font class
文件然后将@import "//at.alicdn.com/t/font_2264842_b004iy0kk2b.css";
Font class
和Symbol
引入inject:同时在custom.css中添加如下样式来控制图标默认大小等属性(以彩色图标为例)inject:
head:
- <link rel="stylesheet" href="//at.alicdn.com/t/font_2264842_b004iy0kk2b.css" media="defer" onload="this.media='all'">
bottom:
- <script async src="//at.alicdn.com/t/font_2264842_b004iy0kk2b.js"></script>.iconfont {
font-family: "iconfont" ;
/* 这里可以自定义图标大小 */
font-size: 3em;
font-style: normal;
-webkit-font-smoothing: antialiased;
-moz-osx-font-smoothing: grayscale;
}
菜单栏多色动态图标(店长)
查看教程
在此之前,请确保引入了fontawesome_animation
的前置依赖和你的iconfont
的Fontclass(css文件)
和symbol(js文件)
inject:
head:
#动画标签anima的依赖
- <link rel="stylesheet" href="https://cdn.jsdelivr.net/gh/l-lin/font-awesome-animation/dist/font-awesome-animation.min.css" media="defer" onload="this.media='all'">
# 阿里矢量图标,这串是我的fontclass图标库,你的链接会有所不同。
- <link rel="stylesheet" href="//at.alicdn.com/t/c/font_4594895_ug57h9tso7.css" media="defer" onload="this.media='all'">
bottom:
# 阿里矢量图标,这串是我的图标库,你的链接会有所不同。
- <script async src="//at.alicdn.com/t/c/font_4594895_ug57h9tso7.js"></script>
- 替换
[BlogRoot]\themes\butterfly\layout\includes\header\menu_item.pug
为以下代码,本方案默认使用观感最佳的悬停父元素触发子元素动画效果,默认动画为faa-tada
。注意:可以把之前的代码注释掉,再在后面加上如下代码,以便于回滚,此代码在butterfly4.13
上可以运行并保留hide字段隐藏子菜单的功能,其他版本自行测试。代码的本质并不复杂,就是扫描配置文件对应的配置项,然后根据||
的分割标志筛选出对应的图标名称、对应链接等,从而渲染出html页面。if theme.menu
.menus_items
each value, label in theme.menu
if typeof value !== 'object'
.menus_item
- const valueArray = value.split('||')
a.site-page.faa-parent.animated-hover(href=url_for(trim(value.split('||')[0])))
if valueArray[1]
i.fa-fw(class=trim(valueArray[1]))
- var icon_value = trim(value.split('||')[1])
- var anima_value = value.split('||')[2] ? trim(value.split('||')[2]) : 'faa-tada'
if icon_value.substring(0,2)=="fa"
i.fa-fw(class=icon_value + ' ' + anima_value)
else if icon_value.substring(0,4)=="icon"
svg.icon(aria-hidden="true" class=anima_value)
use(xlink:href=`#`+ icon_value)
span=' '+label
else
.menus_item
- const labelArray = label.split('||')
- const hideClass = labelArray[3] && trim(labelArray[3]) === 'hide' ? 'hide' : ''
a.site-page.group.faa-parent.animated-hover(class=`${hideClass}` href='javascript:void(0);')
if labelArray[1]
- var icon_label = trim(label.split('||')[1])
- var anima_label = label.split('||')[2] ? trim(label.split('||')[2]) : 'faa-tada'
if icon_label.substring(0,2)=="fa"
i.fa-fw(class=icon_label + ' ' + anima_label)
else if icon_label.substring(0,4)=="icon"
svg.icon(aria-hidden="true" class=anima_label)
use(xlink:href=`#`+ icon_label)
span=' '+ trim(labelArray[0])
i.fas.fa-chevron-down
ul.menus_item_child
each val,lab in value
- const valArray = val.split('||')
li
a.site-page.child.faa-parent.animated-hover(href=url_for(trim(val.split('||')[0])))
if valArray[1]
- var icon_val = trim(val.split('||')[1])
- var anima_val = val.split('||')[2] ? trim(val.split('||')[2]) : 'faa-tada'
if icon_val.substring(0,2)=="fa"
i.fa-fw(class=icon_val + ' ' + anima_val)
else if icon_val.substring(0,4)=="icon"
svg.icon(aria-hidden="true" class=anima_val)
use(xlink:href=`#`+ icon_val)
span=' '+ lab - 以下是填写示例,在
[BlogRoot]\_config.butterfly.yml
中修改。icon-xxx
字样的为iconfont
的symbol
引入方案的id
值,可以在你的iconfont
图标库内查询,其中hide属性也是可以用的。menu:
首页: / || icon-home || faa-tada
文章 || icon--article || faa-tada || hide:
归档: /archives/ || icon-guidang1 || faa-tada
标签: /tags/ || icon-sekuaibiaoqian || faa-tada
分类: /categories/ || icon-fenlei || faa-tada
随便逛逛: javascript:randomPost(); || icon-zuji1 || faa-tada - 要注意的是,这里的动态图标是
svg.icon
的标签,因此上面调节.iconfont
的css
并不使用,我们需要在自定义样式文件custom.css
里加上一些样式来限制图标的大小和颜色等,具体大小自行调节。svg.icon {
width: 1.28em;
height: 1.28em;
vertical-align: -0.15em;
fill: currentColor;
overflow: hidden;
} - 重启项目即可看到效果:
hexo cl; hexo s
挂绳智慧の子(tzy大佬+微调)
查看教程
效果预览:
原教程是领走小猫咪(tzy大佬的网站崩了,原帖看不到了),这次直接用的是Fomal大佬的教程,原来的小猫咪图片没有崩,换成了我自己现在玩Minecraft的皮肤头像,目前在Littleskin获得了13个赞
准备头部图片
这里的头并不是我原来的皮肤,原来的长这样
改了之后让他长得中二一点,就变成了这样
头部的更改,可以使用mcskin软件,补上了前任skin编辑器的漏洞,将眼睛改的中二一点,就像这样:
准备好之后保存皮肤,打开这个网站—>选择你要截取的MC皮肤—>点击正面头像的图片—>下载好后上传到你的图床,没有的可以上传到其他人的图床
使用
- 制作一个盛放内容的盒子,在
[BlogRoot]/node_modules/hexo-theme-butterfly/layout/includes/head.pug
(如果是git clone 安装在[BlogRoot]/themes/butterfly/layout/includes/head.pug
)最后一行加入如下代码:#myscoll
- 在
[BlogRoot]/theme/butterfly/source/js
文件夹下新建一个cat.js,将以下代码复制到文件中。if (document.body.clientWidth > 992) {
function getBasicInfo() {
/* 窗口高度 */
var ViewH = $(window).height();
/* document高度 */
var DocH = $("body")[0].scrollHeight;
/* 滚动的高度 */
var ScrollTop = $(window).scrollTop();
/* 可滚动的高度 */
var S_V = DocH - ViewH;
var Band_H = ScrollTop / (DocH - ViewH) * 100;
return {
ViewH: ViewH,
DocH: DocH,
ScrollTop: ScrollTop,
Band_H: Band_H,
S_V: S_V
}
};
function show(basicInfo) {
if (basicInfo.ScrollTop > 0.001) {
$(".neko").css('display', 'block');
} else {
$(".neko").css('display', 'none');
}
}
(function ($) {
$.fn.nekoScroll = function (option) {
var defaultSetting = {
top: '-1',
scroWidth: 5 + 'px',
z_index: 9999,
zoom: 2.0,
borderRadius: 5 + 'px',
right: 80 + 'px',
// 这里可以换为你喜欢的图片,例如我就换为了MC头像,但是要抠图,
nekoImg: "https://pic.imgdb.cn/item/667f87b7d9c307b7e9f2dcb7.png",
hoverMsg: "亻尔女子",
color: "#000000",
during: 500,
blog_body: "body",
};
var setting = $.extend(defaultSetting, option);
var getThis = this.prop("className") !== "" ? "." + this.prop("className") : this.prop("id") !== "" ? "#" +
this.prop("id") : this.prop("nodeName");
if ($(".neko").length == 0) {
this.after("<div class=\"neko\" id=" + setting.nekoname + " data-msg=\"" + setting.hoverMsg + "\"></div>");
}
let basicInfo = getBasicInfo();
$(getThis)
.css({
'position': 'fixed',
'width': setting.scroWidth,
'top': setting.top,
'height': basicInfo.Band_H * setting.zoom * basicInfo.ViewH * 0.1 + 'px',
'z-index': setting.z_index,
'background-color': setting.bgcolor,
"border-radius": setting.borderRadius,
'right': setting.right,
'background-image': 'url(' + setting.scImg + ')',
'background-image': '-webkit-linear-gradient(45deg, rgba(255, 255, 255, 0.1) 25%, transparent 25%, transparent 50%, rgba(255, 255, 255, 0.1) 50%, rgba(255, 255, 255, 0.1) 75%, transparent 75%, transparent)', 'border-radius': '2em',
'background-size': 'contain'
});
$("#" + setting.nekoname)
.css({
'position': 'fixed',
'top': basicInfo.Band_H * setting.zoom * basicInfo.ViewH * 0.01 - 50 + 'px',
'z-index': setting.z_index * 10,
'right': setting.right,
'background-image': 'url(' + setting.nekoImg + ')',
});
show(getBasicInfo());
$(window)
.scroll(function () {
let basicInfo = getBasicInfo();
show(basicInfo);
$(getThis)
.css({
'position': 'fixed',
'width': setting.scroWidth,
'top': setting.top,
'height': basicInfo.Band_H * setting.zoom * basicInfo.ViewH * 0.01 + 'px',
'z-index': setting.z_index,
'background-color': setting.bgcolor,
"border-radius": setting.borderRadius,
'right': setting.right,
'background-image': 'url(' + setting.scImg + ')',
'background-image': '-webkit-linear-gradient(45deg, rgba(255, 255, 255, 0.1) 25%, transparent 25%, transparent 50%, rgba(255, 255, 255, 0.1) 50%, rgba(255, 255, 255, 0.1) 75%, transparent 75%, transparent)', 'border-radius': '2em',
'background-size': 'contain'
});
$("#" + setting.nekoname)
.css({
'position': 'fixed',
'top': basicInfo.Band_H * setting.zoom * basicInfo.ViewH * 0.01 - 50 + 'px',
'z-index': setting.z_index * 10,
'right': setting.right,
'background-image': 'url(' + setting.nekoImg + ')',
});
if (basicInfo.ScrollTop == basicInfo.S_V) {
$("#" + setting.nekoname)
.addClass("showMsg")
} else {
$("#" + setting.nekoname)
.removeClass("showMsg");
$("#" + setting.nekoname)
.attr("data-msg", setting.hoverMsg);
}
});
this.click(function (e) {
btf.scrollToDest(0, 500)
});
$("#" + setting.nekoname)
.click(function () {
btf.scrollToDest(0, 500)
});
return this;
}
})(jQuery);
$(document).ready(function () {
//部分自定义
$("#myscoll").nekoScroll({
bgcolor: 'rgb(0 0 0 / .5)', //背景颜色,没有绳子背景图片时有效
borderRadius: '2em',
zoom: 0.9
}
);
//自定义(去掉以下注释,并注释掉其他的查看效果)
/*
$("#myscoll").nekoScroll({
nekoname:'neko1', //nekoname,相当于id
nekoImg:'img/猫咪.png', //neko的背景图片
scImg:"img/绳1.png", //绳子的背景图片
bgcolor:'#1e90ff', //背景颜色,没有绳子背景图片时有效
zoom:0.9, //绳子长度的缩放值
hoverMsg:'你好~喵', //鼠标浮动到neko上方的对话框信息
right:'100px', //距离页面右边的距离
fontFamily:'楷体', //对话框字体
fontSize:'14px', //对话框字体的大小
color:'#1e90ff', //对话框字体颜色
scroWidth:'8px', //绳子的宽度
z_index:100, //不用解释了吧
during:1200, //从顶部到底部滑动的时长
});
*/
})
} - 在
[BlogRoot]/theme/butterfly/source/css
文件夹下新建一个cat.css
,将以下代码复制到文件中。当然你也可以选择不新建css文件,复制代码到custom.css
也行,总之有地方引入就行。
body::-webkit-scrollbar {
width: 0;
}
.neko {
width: 74px;
height: 74px;
background-image: url("https://pic.imgdb.cn/item/667f87b7d9c307b7e9f2dcb7.png");/*这个是MC头像*/
position: absolute;
right: 32px;
background-repeat: no-repeat;
background-size: contain;
transform: translateX(50%);
cursor: pointer;
font-family: tzy;
font-weight: 600;
font-size: 16px;
color: #6f42c1;
display: none;
}
.neko::after {
display: none;
width: 100px;
height: 100px;
background-image: url("https://bu.dusays.com/2022/07/20/62d812d95e6f5.png");/*这个是对话气泡,可以不该*/
background-size: contain;
z-index: 9999;
position: absolute;
right: 50%;
text-align: center;
line-height: 100px;
top: -115%;
}
.neko.showMsg::after {
content: attr(data-msg);
display: block;
overflow: hidden;
text-overflow: ellipsis;
}
.neko:hover::after {
content: attr(data-msg);
display: block;
overflow: hidden;
text-overflow: ellipsis;
}
.neko.fontColor::after {
color: #333;
}
/**
* @description: 滚动条样式 跟猫二选一
*/
@media screen and (max-width:992px) {
::-webkit-scrollbar {
width: 8px ;
height: 8px
}
::-webkit-scrollbar-track {
border-radius: 2em;
}
::-webkit-scrollbar-thumb {
background-color: rgb(255 255 255 / .3);
background-image: -webkit-linear-gradient(45deg, rgba(255, 255, 255, 0.1) 25%, transparent 25%, transparent 50%, rgba(255, 255, 255, 0.1) 50%, rgba(255, 255, 255, 0.1) 75%, transparent 75%, transparent);
border-radius: 2em
}
::-webkit-scrollbar-corner {
background-color: transparent
}
} - 在主题配置文件
_config.butterfly.yml
中引入cat.js
和cat.css
,当然还有在bottom的最前面引入jQuery
,因为cat.js
的语法依赖jQuery
。inject:
head:
- <link rel="stylesheet" href="/css/cat.css">
bottom:
- <script defer src="https://npm.elemecdn.com/jquery@latest/dist/jquery.min.js"></script>
- <script defer data-pjax src="/js/cat.js"></script> - 最后重新编译运行即可看见效果。
hexo cl; hexo s
个人信息卡片彩色社交图标引入(店长)
查看教程
- 重写
[BlogRoot]\themes\butterfly\layout\includes\header\social.pug
,替换为以下代码:each value, title in theme.social
a.social-icon.faa-parent.animated-hover(href=url_for(trim(value.split('||')[0])) target="_blank" title=title === undefined ? '' : trim(title))
if value.split('||')[1]
- var icon_value = trim(value.split('||')[1])
- var anima_value = value.split('||')[2] ? trim(value.split('||')[2]) : 'faa-tada'
if icon_value.substring(0,2)=="fa"
i.fa-fw(class=icon_value + ' ' + anima_value)
else if icon_value.substring(0,4)=="icon"
svg.icon(aria-hidden="true" class=anima_value)
use(xlink:href=`#`+ icon_value) - 以下为对应的
social
配置项。写法沿用menu_item
的写法示例,修改[BlogRoot]\_config.butterfly.yml
的social
配置项,具体的链接改为自己的。social:
微信: /assets/QRCode.jpg || icon-weixin || faa-tada
QQ: https://res.abeim.cn/api/qq/?qq=1174008660 || icon-QQ || faa-tada
B站: https://space.bilibili.com/220757832 || icon-bilibili || faa-tada
QQ邮箱: mailto:1174008660@qq.com || icon-youxiang || faa-tada
力扣: https://leetcode.cn/u/fomalhaut1998 || icon-leetcode || faa-tada - 要注意的是,这里的动态图标是
svg.icon
的标签,因此上面调节.iconfont
的css
并不使用,我们需要在自定义样式文件custom.css
里加上一些样式来限制图标的大小和颜色等,具体大小自行调节(如果上面弄过菜单栏的图标大小,这里也就不需要再重复写了)。svg.icon {
width: 1.28em;
height: 1.28em;
vertical-align: -0.15em;
fill: currentColor;
overflow: hidden;
}
顶部渐变加载条
查看教程
- 在
[BlogRoot]\source\css\custom.css
加入以下代码.pace {
-webkit-pointer-events: none;
pointer-events: none;
-webkit-user-select: none;
-moz-user-select: none;
user-select: none;
z-index: 2000;
position: fixed;
margin: auto;
top: 4px;
left: 0;
right: 0;
height: 8px;
border-radius: 8px;
width: 7rem;
background: #eaecf2;
border: 1px #e3e8f7;
overflow: hidden
}
.pace-inactive .pace-progress {
opacity: 0;
transition: .3s ease-in
}
.pace .pace-progress {
-webkit-box-sizing: border-box;
-moz-box-sizing: border-box;
-ms-box-sizing: border-box;
-o-box-sizing: border-box;
box-sizing: border-box;
-webkit-transform: translate3d(0, 0, 0);
-moz-transform: translate3d(0, 0, 0);
-ms-transform: translate3d(0, 0, 0);
-o-transform: translate3d(0, 0, 0);
transform: translate3d(0, 0, 0);
max-width: 200px;
position: absolute;
z-index: 2000;
display: block;
top: 0;
right: 100%;
height: 100%;
width: 100%;
/* linear-gradient(to right, #3494e6, #ec6ead) */
background: linear-gradient(to right, #43cea2, #3866ca);
animation: gradient 2s ease infinite;
background-size: 200%
}
.pace.pace-inactive {
opacity: 0;
transition: .3s;
top: -8px
} - 在主题配置文件_config.butterfly.yml的inject配置项加入刚刚的css样式和必须的js依赖:
bottom:
- xxx
- <script async src="//npm.elemecdn.com/pace-js@1.2.4/pace.min.js"></script>